How to deploy a Shiny app on CREATE Cloud
There are three main steps to deploy a Shiny app on CREATE Cloud:
- Set up a CREATE Cloud instance to host the app
- Install R and Shiny Server
- Set up your app
This guide covers each of these steps, and references external documentation for detailed instructions on specific steps.
In addition, to make it easier to continue developing your app and keep the deployed version up to date, we recommend that:
- you keep your project under version control (e.g. with git)
- For a relatively quick introduction to using Git and GitHub, please see introducing-git.
- you use a dependency management tool such as renv to manage your project's dependencies
Pre-requisites
- be able to navigate and run commands on a Linux system using the command line
- know how to use SSH keys to connect to a remote server via SSH
- have a Portal project registered with a cloud project activated which you wish to associate with your Shiny app. For details see CREATE Cloud Get Started.
Setting up a CREATE Cloud instance
For full details on creating an instance in CREATE Cloud please see Create Cloud Instance Creation.
Some specific points for Shiny apps:
- The free tier is likely to be suitable for many Shiny apps (e.g. for an app accompanying a paper), but please see the details, and particularly the caveats, on the pricing page.
- Select an instance flavour with sufficient RAM for your app - at least 2GB is recommended. The resources can be increased later if necessary.
- Select a sufficient disk size for your data. The default is 10GB, which should be sufficient for most purposes. Large research data should be stored on RDS, which you can connect to your instance.
Some general points to remember and ensure:
- an ssh key pair is associated with the instance so that you can access it via ssh.
- the
er_ssh_from_bastionsSecurity Group is applied as described on CREATE Cloud Instance Creation - ssh access is tested and working. The default account you use to access the instance has the username 'ubuntu' and has sudo (admin) rights. See "Connect via SSH"
Install R and Shiny Server
Before installing Shiny Server, you will need to install some dependencies, including R and the Shiny R package.
First, it's good practice to update software that is already installed on the instance:
1 2 | |
Then install R following the instructions provided by CRAN. This will install the most recent version of R. To install a different version, see these alternative instructions.
There are a couple of other dependencies that are required for Shiny Server:
1 | |
Once you have installed R and these additional dependencies, install the Shiny R package:
1 | |
You can now install Shiny Server following the instructions on Posit's website.
Check that installation was successful
If the Shiny Server installation was successful, the included sample app will now be running and be available on port 3838 on your instance. You can check if this is the case by running:
1 | |
The output HTML should include a line saying "If you're seeing this page, that means Shiny Server is installed and running. <strong>Congratulations!</strong>".
The sample apps are not yet accessible via the web, only from the instance.
Make the sample Shiny apps accessible via the web
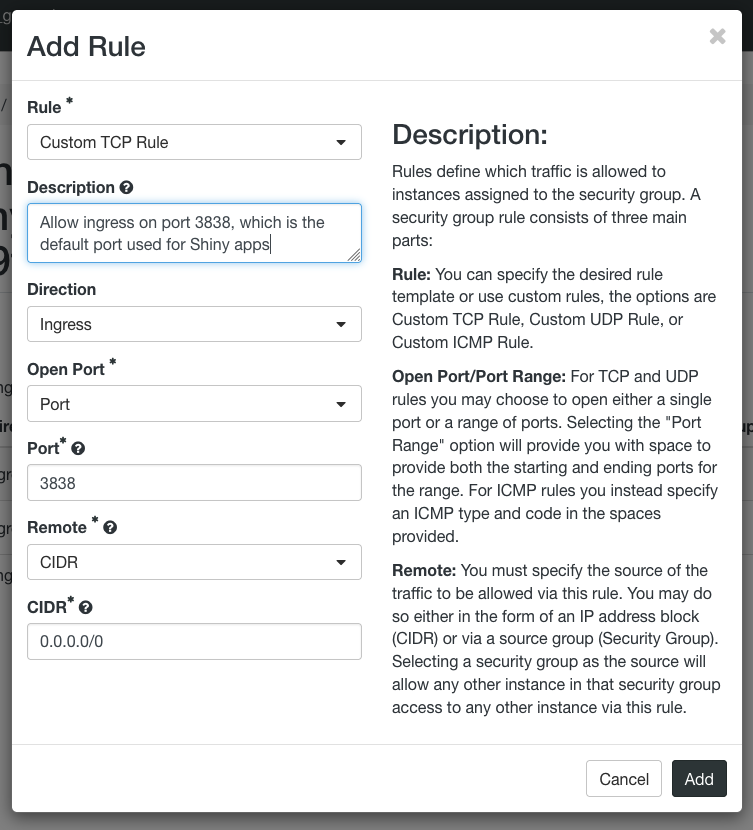
To make the apps running via Shiny Server accessible via a web browser, you need to set up an appropriate security group. In the CREATE Cloud web interface, go to Network > Security Groups and click on "Create Security Group". Create a new group, give it a sensible name (e.g. "shiny"), and add a rule to the group that allows ingress on port 3838. You can leave all other settings at their defaults.
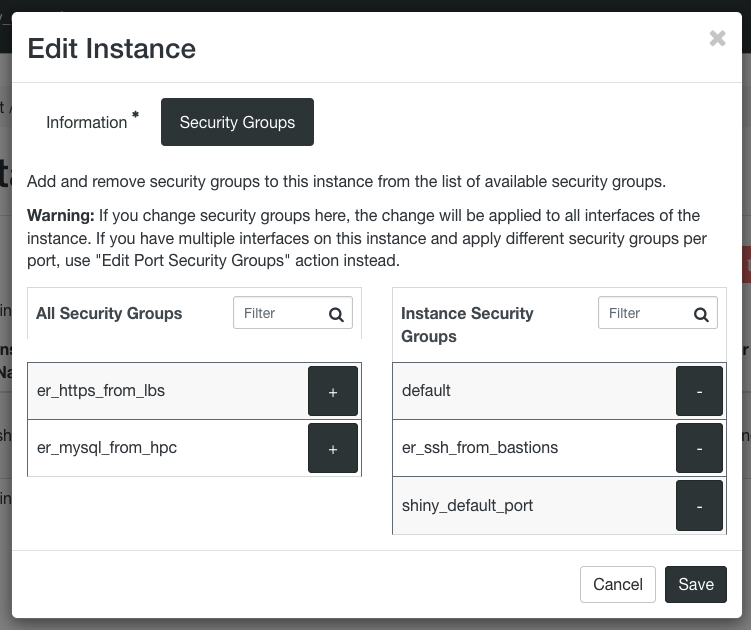
Once the security group has been created, add it to your instance by going to Compute > Instances > Actions and selecting "Edit security groups".
You should now be able to navigate to your_instance_ip:3838 (e.g. 10.211.123.123:3838) in your browser, and view the sample apps.
Set up your app
By default, Shiny Server will run any apps located in the /srv/shiny-server directory. Other configurations are possible (see the Shiny Server docs), but for the purposes of this guide, we will use this default approach.
You will need to copy the code for your app into /srv/shiny-server/. Ideally, your code should be under version control e.g. in a Git repository and you can clone it directly using git clone. NB that to git clone to your instance via ssh you will need to create an SSH key pair for your instance and associate it with your Github account (or other remote repo).
You should also make sure any data required for your app is copied to your instance or made available to the instance via RDS.
Install app dependencies
You will need to install any additional R packages your Shiny app requires. You can install these manually using install.packages, but we recommend using renv to create a reproducible environment for your project.
To install dependencies using renv, ensure that the renv.lock, .Rprofile, renv/settings.json and renv/activate.R files from your project are copied to the instance. Start R in the directory containing the renv.lock file, then install renv and restore the environment:
1 | |
1 2 | |
renv package install uses a global cache, outside of the project directory, to reduce duplication of package installation across projects. This is helpful when you have multiple renv projects on the same machine. However, renv's cache cannot be shared across users. This is a problem here because Shiny Server will run apps as the user shiny, not as the ubuntu user or as root. To allow the shiny user to access the installed packages, we need to isolate the project from the global cache:
1 | |
Check that your app runs
Your app should now run and be available at your_instance_ip:3838/project_name/ (where project_name is the name of the directory within /srv/shiny-server/ that contains your app code).
You may need to restart the Shiny Server process to start your app. To do so, run sudo systemctl restart shiny-server.
If your app is not running, check the logs for any issues. The default location for app-specific logs is /var/log/shiny-server/; log files for individual apps will have names in the form <application directory name>-YYYMMDD-HHmmss-<port number or socket ID>.log. Logs for Shiny Server itself can be found in /var/log/shiny-server.log.
Give your app a custom URL
Finally, if you want to make your app accessible via a custom URL, and manage access to this URL, you can do this via the Portal.
Navigate to the project group your instance is associated with. Click on "Add Resource", then "Standard Website". If you do not see the "Add Resource" option, contact the group admin or e-Research - you may need an increased access level.
Give your site a name, and select a domain name for it, e.g. "projectname.sites.er.kcl.ac.uk". If you have a custom domain name already, you can enter that here. You can then select whether you want the site to be visible to only internal users on the King's network, or also to external users, and whether you want to require users to log in with KCL credentials before they can view the site.
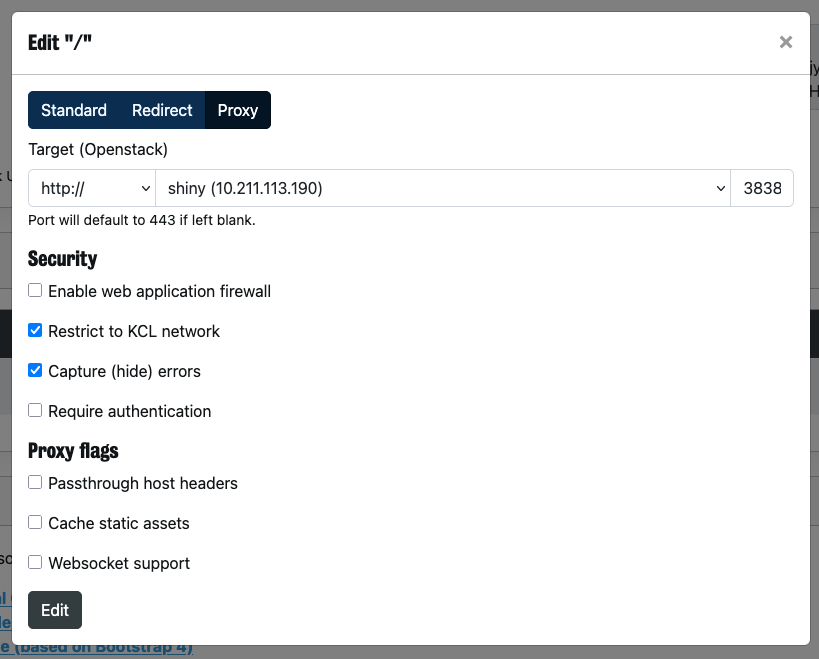
Once you have created the site, you need to link it to your app. Click on "View" next to the site name, then add a new location (e.g. "/shiny/") or edit the default location "/". Under "Handling", select "Proxy", then as the target select the OpenStack instance that is running your Shiny Server. You will also need to specify the port 3838. You can manage access for this location here as well, for example by restricting access to the KCL network or requiring authentication.
Save the configuration, and within a few minutes your Shiny app will be available at your specified URL! For example, if your chosen domain name was "projectname.sites.er.kcl.ac.uk", and you configured the default location "/" to point to port 3838 of your OpenStack instance, then your app will be available at "projectname.sites.er.kcl.ac.uk/project_name" (where project_name is the name of the directory within /srv/shiny-server/ that contains your app code).
Note that the sample apps will be available at "projectname.sites.er.kcl.ac.uk", just as they were available at your_instance_ip:3838. You can remove them by deleting or renaming the /srv/shiny-server/index.html file. Alternatively you can modify the Shiny Server configuration (in /etc/shiny-server/shiny-server.conf) to host a single application.
Managing and developing your app
Updating the app and its dependencies
If you have your app under version control with git, you can use git pull to pull the updated code to your OpenStack instance from a remote repository. If you update or add any dependencies, you will need to run renv::restore() and renv::isolate() again to install new dependencies and make them usable by the shiny user. You may also need to restart the Shiny Server process by running sudo systemctl restart shiny-server.
Increasing resources
If you need increased resources for your OpenStack instance, you can resize the instance in the web interface. Under Compute > Instances > Actions, select "Resize instance" then select a new flavour.
You will typically not need more than one CPU per Shiny app that you are running on your instance. Shiny Server allows multiple connections per session. To estimate the amount of RAM that you need to run an app, you can look at the amount of memory that is used when running the app in RStudio.